How to Build a DIY Garden Potting Table
A guide on creating a practical and stylish potting table for your garden, enhancing your gardening experience and organization. Save money and customize the design to fit your space and needs.

Gathering Materials
When embarking on the journey of building your own DIY garden potting table, one of the crucial initial steps is gathering the necessary materials. Selecting the right wood, tools, and accessories can significantly impact the final outcome of your project. The choice of materials not only affects the aesthetics but also the durability and functionality of the potting table.
Begin by considering the type of wood that best suits your needs. Opt for sturdy and weather-resistant options such as cedar or pressure-treated pine to ensure longevity, especially in outdoor settings. Additionally, think about the sustainability of the wood you choose, aiming for eco-friendly and responsibly sourced materials to align with your values.
Equally important is having the right tools at your disposal to facilitate the construction process. Basic tools like a saw, drill, measuring tape, and screwdriver are essential for cutting and assembling the wood effectively. Investing in quality tools can make the building process smoother and more precise.
Furthermore, don't forget about the accessories that will enhance the functionality of your potting table. Consider adding features like hooks for hanging tools, a potting soil container, or a built-in sink for convenience. These accessories can elevate the usability of your table and streamline your gardening tasks.
When sourcing materials, keep an eye out for cost-effective options without compromising on quality. Look for sales at local hardware stores, repurpose materials from previous projects, or consider salvaging wood from pallets for a budget-friendly approach. By being resourceful and strategic in your material selection, you can create a practical and stylish potting table without breaking the bank.
Planning the Design
A guide on creating a practical and stylish potting table for your garden, enhancing your gardening experience and organization. Save money and customize the design to fit your space and needs.
Selecting the right wood, tools, and accessories needed for constructing a durable and functional potting table. Tips on sourcing materials economically and sustainably.
When it comes to planning the design of your DIY garden potting table, it's essential to start with a clear vision in mind. Consider the dimensions of your available space, the height that is comfortable for you to work at, and the storage options that will best suit your gardening needs. Think of it as creating a blueprint for your gardening sanctuary, where everything has its place and purpose.
Step-by-step instructions on constructing the sturdy frame of the potting table, ensuring stability and durability. Tips on reinforcing joints and selecting the appropriate fasteners.
Installing a spacious and practical work surface on the potting table, providing ample space for potting plants, arranging tools, and organizing supplies. Choosing the right material for easy cleaning and maintenance.
Designing and building storage solutions such as shelves, drawers, and hooks to keep gardening tools, pots, and supplies organized and easily accessible. Maximizing space efficiency and functionality.
Applying a protective finish to the potting table to enhance its durability and weather resistance. Adding aesthetic elements such as paint, stain, or decorative details to personalize the table.
Strategies for organizing tools, potting soil, seeds, and other gardening essentials on the potting table for efficient workflow and easy access. Tips on maintaining a tidy and functional workspace.
Practical tips on using the DIY garden potting table effectively for various gardening tasks, from repotting plants to starting seeds. Maximizing the table's utility and convenience in your gardening routine.
Have a question about building your DIY garden potting table? Check out some common queries below:
- Q: How can I customize the design of my potting table to fit my specific needs?
- A: You can adjust the dimensions, add or remove storage elements, and choose materials that suit your style and functionality requirements.
- Q: What type of wood is best for building a potting table?
- A: Cedar, redwood, or pressure-treated pine are popular choices due to their durability and resistance to moisture.
- Q: How can I protect my potting table from the elements?
- A: Applying a weatherproof sealant or outdoor paint can help protect the wood from rain, sun, and other weather conditions.
Building the Frame
When it comes to building the frame of your DIY garden potting table, it's crucial to focus on creating a sturdy foundation that will support the weight of your gardening activities. The frame serves as the backbone of the table, providing stability and durability for years to come. To start, you'll need to select high-quality wood that can withstand outdoor conditions and heavy use. Opt for treated lumber or cedar, known for their resistance to rot and decay.
Begin by measuring and cutting the wood according to your design plan, ensuring precise angles and dimensions for a seamless fit. As you assemble the frame, pay close attention to reinforcing joints with screws or nails to prevent wobbling or instability. Consider using corner braces or brackets for added support, especially at the legs and corners where the table bears the most weight.
When selecting fasteners for the frame, choose weather-resistant options such as galvanized screws or stainless steel nails to prevent rusting over time. These durable fasteners will ensure the longevity of your potting table, even in harsh outdoor environments. Take your time during the assembly process to double-check measurements and alignments, guaranteeing a solid and reliable frame.
Remember that the frame is not just a structural component but also contributes to the overall aesthetic of your potting table. Consider adding decorative elements or trim pieces to enhance the visual appeal of the frame. You can also paint or stain the wood to match your garden decor or create a cohesive look with other outdoor furniture.

Adding Work Surface
When it comes to adding the work surface to your DIY garden potting table, you want to ensure that it is not only spacious but also practical for your gardening needs. The work surface is where you will be potting plants, arranging tools, and organizing supplies, so choosing the right material is crucial for easy maintenance and durability.
One popular option for the work surface is a sturdy and easy-to-clean material like pressure-treated wood or exterior-grade plywood. These materials are resilient to moisture and can withstand the wear and tear of gardening activities. Additionally, consider adding a lip around the edges of the work surface to prevent soil and water from spilling over.
If you prefer a more customizable approach, you can create a work surface with built-in compartments or trays for organizing small items like seeds, labels, or hand tools. This not only adds functionality to your potting table but also helps keep your workspace organized and clutter-free.
Another consideration when adding the work surface is the height of the table. Ensure that the surface is at a comfortable height for you to work on without straining your back. You may need to adjust the table legs or add risers to achieve the ideal working height.
Remember, the work surface is the central hub of your potting table, so make sure it meets your gardening requirements and enhances your workflow. By choosing the right material, incorporating practical features, and adjusting the height accordingly, you can create a functional and efficient workspace for all your gardening tasks.

Incorporating Storage
When it comes to into your DIY garden potting table, you have the opportunity to enhance the functionality and organization of your gardening space. By designing and building storage solutions that cater to your specific needs, you can ensure that your tools, pots, and supplies are easily accessible and neatly arranged.
One effective way to incorporate storage is by adding shelves to your potting table. These shelves can hold various gardening essentials such as pots, watering cans, and fertilizers, keeping them within reach while you work. Consider installing adjustable shelves to accommodate items of different sizes and shapes.
Drawers are another valuable storage option for your potting table. They provide a designated space for smaller tools, seeds, and labels, helping you keep track of your gardening inventory. Opt for sturdy drawer slides to ensure smooth operation and durability.
Utilizing hooks on the sides or back of your potting table can also maximize storage efficiency. Hang frequently used tools like trowels, pruners, and gloves for easy access. Additionally, you can hang lightweight baskets or containers to store smaller items like seed packets and markers.
When designing storage solutions for your potting table, prioritize space efficiency and accessibility. Ensure that each storage element is strategically placed to facilitate a smooth workflow and minimize clutter. By incorporating shelves, drawers, and hooks into your potting table design, you can create a well-organized and functional gardening station that elevates your planting experience.

Finishing Touches
When it comes to adding the finishing touches to your DIY garden potting table, there are several key elements to consider. One crucial step is applying a protective finish to the table to enhance its durability and weather resistance. This will ensure that your potting table can withstand outdoor conditions and last for years to come.
Additionally, you may want to think about adding aesthetic elements to personalize your potting table. This could involve painting the table in a color that complements your garden aesthetic, staining the wood for a natural look, or incorporating decorative details that reflect your personal style. These finishing touches not only add visual appeal but also make your potting table a unique and personalized space in your garden.
When choosing a protective finish for your potting table, opt for products that are specifically designed for outdoor use. Look for finishes that provide UV protection, water resistance, and durability against wear and tear. Applying multiple coats of finish can further enhance the table's longevity and protection against the elements.
Another important aspect of finishing touches is ensuring that the surfaces of your potting table are smooth and easy to clean. This will make maintenance and upkeep a breeze, allowing you to focus on your gardening tasks without worrying about dirt or debris accumulating on the table.
Remember, the finishing touches on your DIY garden potting table are not just about aesthetics; they also play a crucial role in the table's functionality and longevity. By investing time and effort into these final details, you can create a potting table that not only looks great but also stands the test of time in your garden.

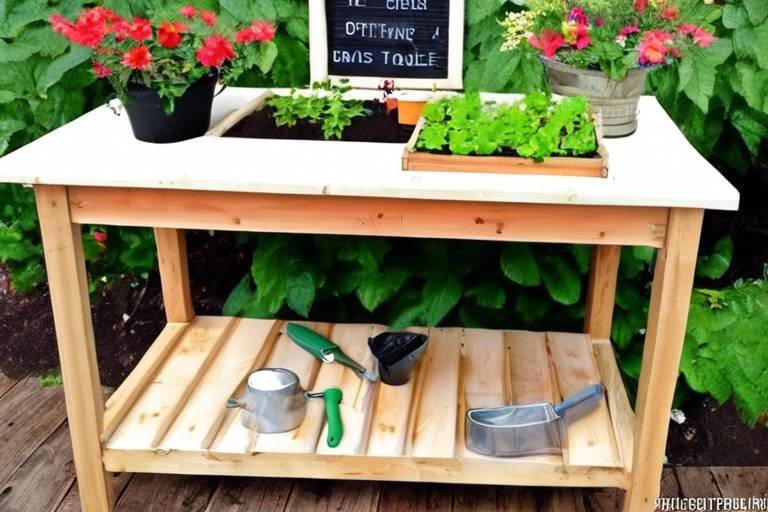
Organizing Tools and Supplies
When it comes to organizing tools and supplies on your DIY garden potting table, efficiency and accessibility are key. Imagine your potting table as a well-organized workshop where every tool has its place and every supply is within arm's reach. By strategically arranging your gardening essentials, you can streamline your workflow and make the most of your potting table.
One effective strategy for organizing tools and supplies is to categorize them based on frequency of use. Keep frequently used tools such as trowels, pruners, and gloves in easily accessible containers or hanging hooks. Utilize drawers or shelves for less frequently used items like extra pots, plant labels, or fertilizers.
Consider creating designated zones on your potting table for different tasks. Have a section for potting soil and seeds, another for transplanting tools, and a designated area for watering cans and spray bottles. This way, you can quickly locate what you need without any hassle.
Utilizing containers and organizers can also help keep your tools and supplies in order. Use small buckets, jars, or caddies to corral smaller items like plant markers, scissors, or twine. Labeling containers can further enhance organization and save you time when searching for specific items.
If space allows, you can incorporate a pegboard or tool rack on the wall behind your potting table to hang larger tools such as shovels, rakes, or hoses. This not only frees up valuable workspace but also adds a visual element to your gardening area.
Remember, the goal of organizing tools and supplies on your potting table is to create a functional and efficient workspace that enhances your gardening experience. By implementing smart storage solutions and maintaining a tidy setup, you can focus on enjoying the process of gardening without the frustration of searching for misplaced tools or supplies.
Utilizing the Potting Table
Utilizing the potting table effectively is key to maximizing its benefits in your gardening routine. This versatile piece of furniture can serve multiple purposes and make your gardening tasks more efficient and enjoyable. When using the potting table, consider the layout of your tools and supplies for easy access and workflow. Keep frequently used items within reach and organize them in a way that makes sense to you.
One practical way to utilize the potting table is by designating specific areas for different tasks. For example, you can have a section for potting plants, another for storing tools, and a separate area for seed starting. This division of space helps streamline your gardening activities and keeps everything organized.
Additionally, make use of the storage solutions incorporated into the potting table. Utilize shelves, drawers, and hooks to keep your gardening essentials neatly arranged. By having designated storage spaces, you can easily locate items when needed and maintain a clutter-free workspace.
When working on the potting table, ensure that the work surface is kept clean and clutter-free. Clear off any debris or soil after each use to maintain a hygienic environment for your plants. Regularly sanitize the work surface to prevent the spread of pests and diseases among your garden greenery.
Furthermore, take advantage of the height and ergonomic design of the potting table. Avoid straining your back by adjusting the table to a comfortable working height. This will prevent fatigue and discomfort, allowing you to focus on your gardening tasks with ease.
Lastly, experiment with different layouts and organization strategies to find what works best for you. The beauty of a DIY potting table is the ability to customize it according to your preferences and gardening style. By tailoring the table to suit your needs, you can create a functional and personalized workspace that enhances your gardening experience.
Frequently Asked Questions
- Can I customize the design of the potting table to fit my specific needs?
Yes, one of the advantages of building a DIY garden potting table is the ability to customize the design according to your space and requirements. You can adjust the dimensions, add or remove storage options, and choose the finish that best suits your style.
- What type of wood is recommended for building a sturdy potting table?
For a durable and long-lasting potting table, it is recommended to use rot-resistant wood such as cedar, redwood, or pressure-treated lumber. These types of wood can withstand outdoor conditions and moisture, ensuring the table remains stable and functional for a longer period.
- How can I effectively organize tools and supplies on the potting table?
To maintain a tidy and efficient workspace, consider using hooks, shelves, and drawers to store tools, pots, potting soil, and other essentials. Utilize containers or bins to categorize items and keep them easily accessible while working on gardening tasks.
- Is it necessary to apply a protective finish to the potting table?
Applying a protective finish such as outdoor varnish or paint is recommended to enhance the table's durability and weather resistance. This will help prevent damage from exposure to sunlight, moisture, and other outdoor elements, ensuring the table remains in good condition for a longer period.
- How can I maximize the utility of the potting table for various gardening tasks?
Utilize the spacious work surface for potting plants, arranging tools, and organizing supplies efficiently. Keep frequently used items within reach and maintain a clutter-free workspace to streamline your gardening activities. The potting table can serve as a central hub for all your gardening needs, making tasks more convenient and enjoyable.